


Table of contents
- What is a README File?
- How to Write a Good README – a Step by Step Guide
- How to make visible README file on Profile:-
- What to Include in your README
- 1. Project's Title
- 2. Project Description
- 3. Table of Contents (Optional)
- 4. How to Install and Run the Project
- 5.How to Use the Project
- 6. Include Credits
- 7.Add a License
- 8.Screenshots
- 9.Features
- 10.Code Example
- 11.API Reference
- 12.Tests
- Additional README Sections
- Markdown Language Notations
- Headings
- Emphasis
- Quoting text
- Paragraphs
- Lists
- Summary
What is a README File?
README file is a guide that gives users a detailed description of a project.
This file should be written in brief so that any person encounters this file will get detail overview of project you work on.
How to Write a Good README – a Step by Step Guide
Here are some guide questions that will help you out:
What was your motivation?
Why did you build this project?
What problem does it solve?
What did you learn?
What makes your project stand out?
If your project has a lot of features, consider adding a "Features" section and listing them here.
How to make visible README file on Profile:-
Create a new repository with the same name as that of your Github account.
Add a README file to it
Go to the README file where you can commit the changes.
What to Include in your README
1. Project's Title
This is the name of the project. We have to give some relevant name to the project which helps others to understand goal of your project.
2. Project Description
In project description you can include whatever work you want to showcase.
3. Table of Contents (Optional)
We can add a table of contents if in case our readme file is too long so that people can navigate through our profile easily.
4. How to Install and Run the Project
You can provide step by step description on how to set development environment and run project.
5.How to Use the Project
You can provide instructions and examples which users or contributors can refer while using project.
6. Include Credits
If you worked on the project as a team or an organization, list your collaborators/team members.
This is just a way to show your appreciation and also to help others get a first hand copy of the project.
7.Add a License
For most README files, this is usually considered the last part. It lets other developers know what they can and cannot do with your project.
8.Screenshots
Include logo/demo screenshot etc.
9.Features
What makes your project stand out? Add those features.
10.Code Example
Show what the library does as concisely as possible, developers should be able to figure out how your project solves their problem by looking at the code example.
11.API Reference
Depending on the size of the project, if it is small and simple enough the reference docs can be added to the README. For medium size to larger projects it is important to at least provide a link to where the API reference docs live.
12.Tests
Describe and show how to run the tests with code examples.
Additional README Sections
13. Badges
Badges aren't necessary, but using them is a simple way of letting other developers know that you know what you're doing.
Having this section can also be helpful to help link to important tools and also show some simple stats about your project like the number of forks, contributors, open issues etc
Markdown Language Notations
We can use below formatting elements in our readme file.We can style digital document using this lightweight markup language called as Markdown.
Here are few elements listed which we can use in our readme file to make it aesthetically pleasant.
Headings
To create a heading, add one to six # symbols before your heading text. The number of # you use will determine the hierarchy level and typeface size of the heading.
# A first-level heading
## A second-level heading
### A third-level heading
Emphasis
You can add emphasis by making text bold or italic.
Bold
To bold text, add two asterisks or underscores before and after a word or phrase. To bold the middle of a word for emphasis, add two asterisks without spaces around the letters.
Italic
To italicize text, add one asterisk or underscore before and after a word or phrase. To italicize the middle of a word for emphasis, add one asterisk without spaces around the letters.
Quoting text
You can quote text with a >.
Text that is not a quote

> Text that is a quote
Paragraphs
To create paragraphs, use a blank line to separate one or more lines of text.
Lists
You can organize items into ordered and unordered lists.
Ordered Lists
To create an ordered list, add line items with numbers followed by periods. The numbers don’t have to be in numerical order, but the list should start with the number one.
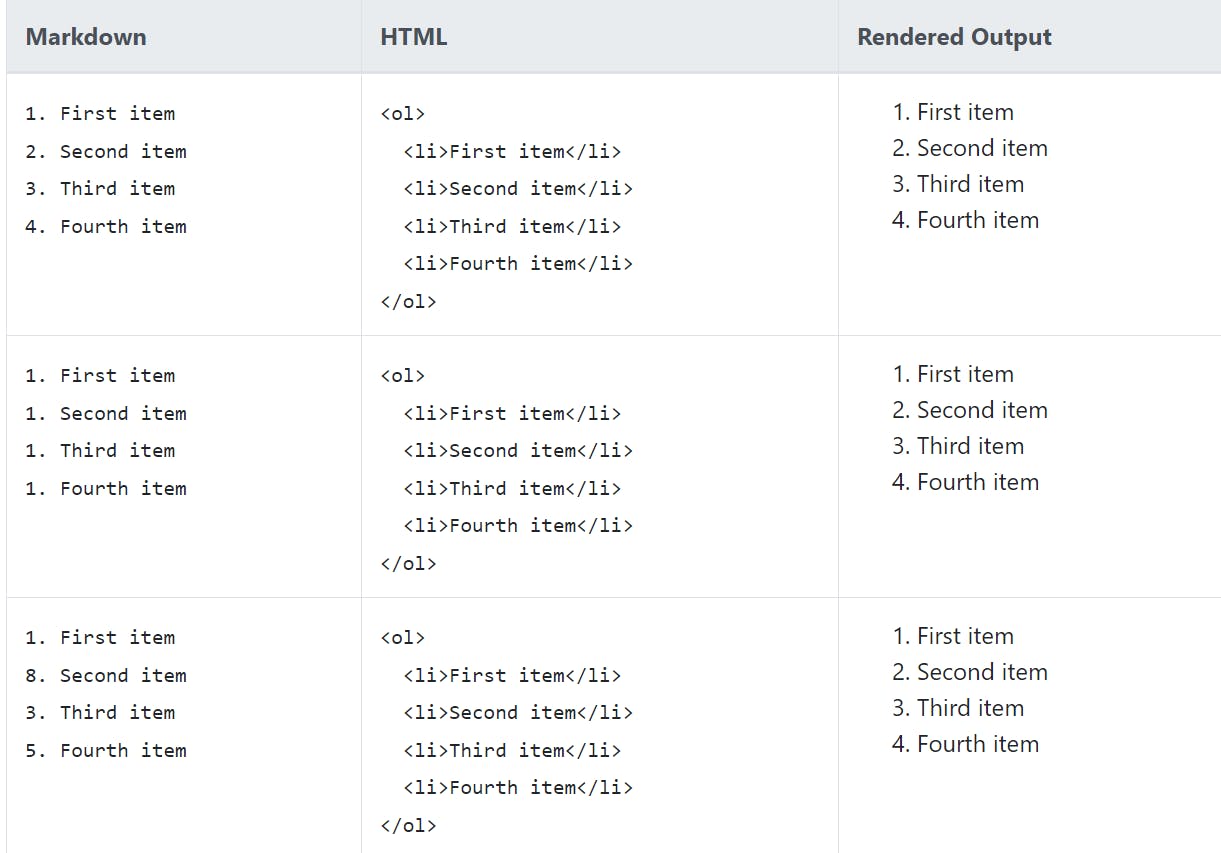
Unordered Lists
To create an unordered list, add dashes (-), asterisks (*), or plus signs (+) in front of line items.
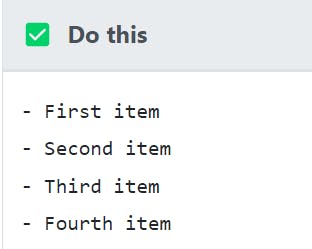
Note: In above example, instead of - we can use * or + for creating unordered list.
Summary
If you are working in an Open Source project, the README file is a key one-stop document that can boost the developer experience.
To write a good readme you need to keep in mind the types of audience that will read the file: end-users, technical users and contributors.
You should pay attention on how people read on the web, helping them to scan your README using Markdown, and the good practices for writing for the web such as short paragraphs, lists and the inverted pyramid writing schema.
The contents of the README should follow a structure that first introduces the project, then explains how install and use it and, finally, explains how to get involved in the project as contributor.
I hope you enjoyed this article. Stay tuned for more such articles.